Asterisk Cheese Board
Oct 22, 2015
Wood Preperation

Brazilian walnut glue ups being prepared for the CNC Machine
My inspiration for this came from seeing carved cheese boards in a catalog. Most of those boards had very little room for both cheese and crackers and none of them had a knife slot. I had one 4/4 6" wide stick of brazilian walnut left I knew would be perfect for making a couple of these.
The glue up for these was really easy as the board was already S4S. I used the Titebond III for the glue and left them clamped for 24 hours. A run through the drum sander made sure I had a true surface. I then trued up the sides that were glued together so I had S4S again.
Getting a measurement was all I needed to get at this point; to the PC I went.
Finished Cheese Board
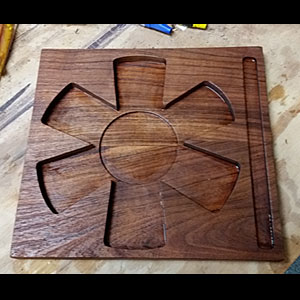
Cheese board made out of Brazilian Walnut, with knife slot and cheese ramikin depression.
At the PC I opened Aspire 8.0 and began to draw up some examples. The one I settled on was the most efficient, the most cracker to cheese ratio. :) Once I settled on a design I previewed it to make sure it would work ok. I put one of the boards on the cnc installed my end mill and cut it. About half way through the board slipped out of its hold down and impaled itself on the end mill (lesson - always keep one eye on the CNC). I managed to make it work without the knife slot for this one.
Putting the second blank on the CNC and redoing the hold downs tighter than before. This time the cut went well and finished without incident. Time for 200 sanding just to make sure theres no fuzzies or raised grain. I finished both blanks with the usual mineral oil and wax finish. I now let it dry and did a light sanding of 400. Repeat untill you get that luster that pops the walnut. The picture does not do the rich tones and colors, flourescent shop lights do not make for good pictures.